Welcome!
This guide will help you get started with setting up a delivery pipeline on Visual Studio Team Services account. In the Getting Started section below, we're going to start with a simple scenario: run a Hello World script on a set of virtual machines.
Later in this guide, we will walk through some deployment related concepts, then specify the deployment machines, configure them and so on. Feel free to explore around.
This guide is a product of the community. You can contribute too! We gladly accept any improvements and ideas :)
Please read the disclaimer.
Getting started
We'll assume you already have a VSTS account. You can get yourself one here.
Setup a release definition
Navigate to https://youraccount.visualstudio.com/.
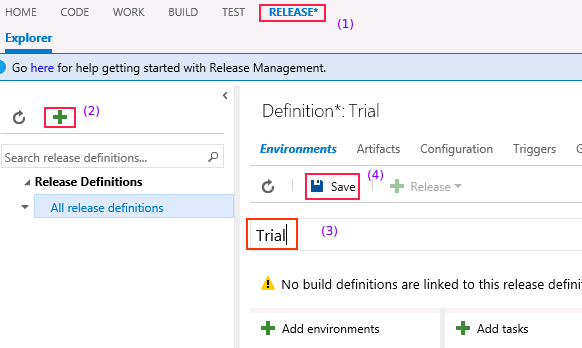
Figure: Create a release definition
Steps to create a release definition:
- Navigate to the Release Hub in your VSTS account
- Click on the + button
- Provide a name for the Release Definition. In the figure, we name it as Trial
- Save the definition
Configure a local agent
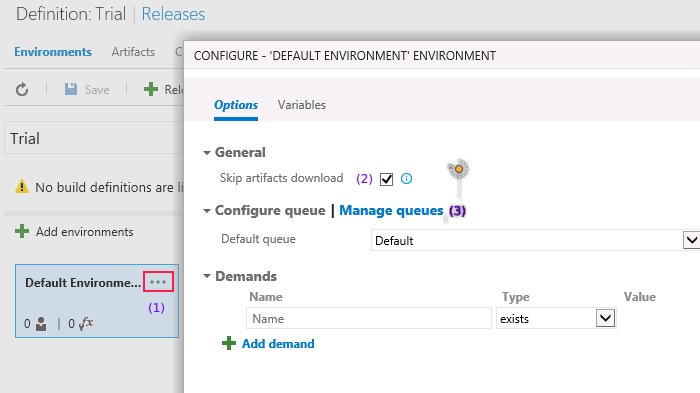
Figure: Linking an agent queue for the Release Definition
Steps to link an agent:
- Click on the options for the Environment Default Environment
- We will set Skip artifacts download for this example. This will allow us to run a release without linking it to a Build Definition
- We've configured the Release Definition to pick up any available agent from Default queue. Manage Queues allows to setup a agent to run the release definition
Click on Manage Queues to move to the page shown below. Let's download and configure the agent now.
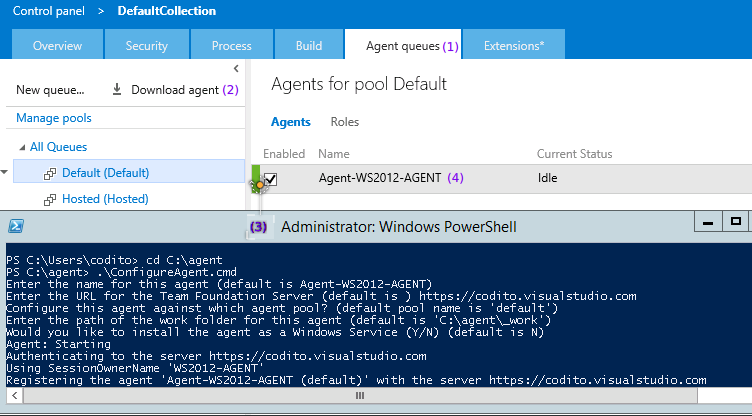
Figure: Configure an Agent for the Default queue
Steps to configure an Agent:
- Navigate to Agent Queues settings in Collection configuration (step 3 above will open this page in a new browser window)
- Download the agent zip file to local machine
- We run the commands to configure an agent
MSDN covers this topic is great detail.
Add a remote powershell task
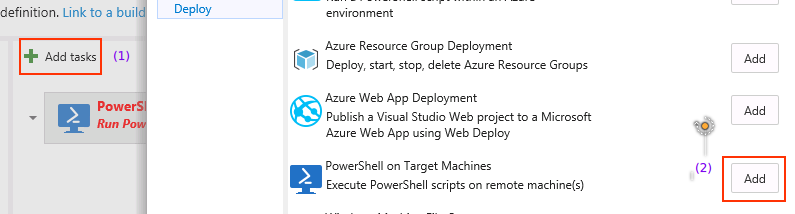
Figure: Add the remote powershell task
Steps to add the Remote Powershell task:
- Click on Add Tasks to bring up the available Tasks
- Filter the tasks with Deploy category. Click on Add to add the remote powershell task to release definition
Specify Target machines, connection parameters
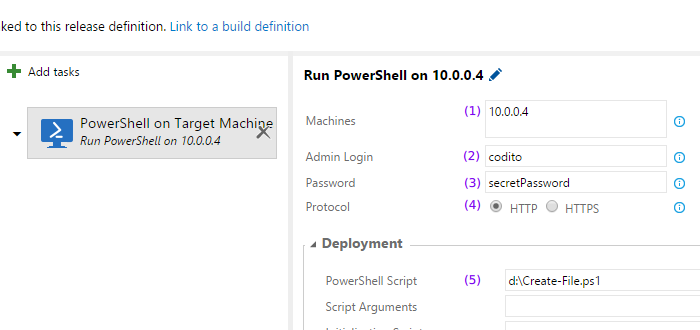
Figure: Setup target machines and winrm configuration in remote powershell task
Steps to configure Remote Powershell task:
- Use the IP address of remote machine (in this example, the machine is in a local network)
- Provide administrator username for 10.0.0.4
- Provide the administrator password for 10.0.0.4
- Choose HTTP protocol, we assume that the machine is configured for WinRM over HTTP in this example
- Instruct the task to run
D:\Create-File.ps1in the remote machine
We cover the Step 1 in much more detail in Specify Target Machines section. WinRM configuration is covered in Configure Connections section of this guide.
Now let's create the file Create-File.ps1 in the machine 10.0.0.4. We run
these commands in the Agent machine, since 10.0.0.4 is on the local network,
we just use windows file sharing to create the file.
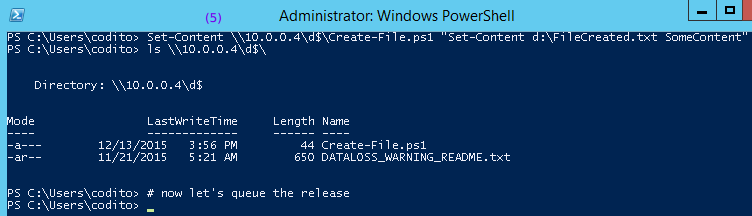
Figure: Create the remote script
Queue a release
At this point, we're all set to queue a release.
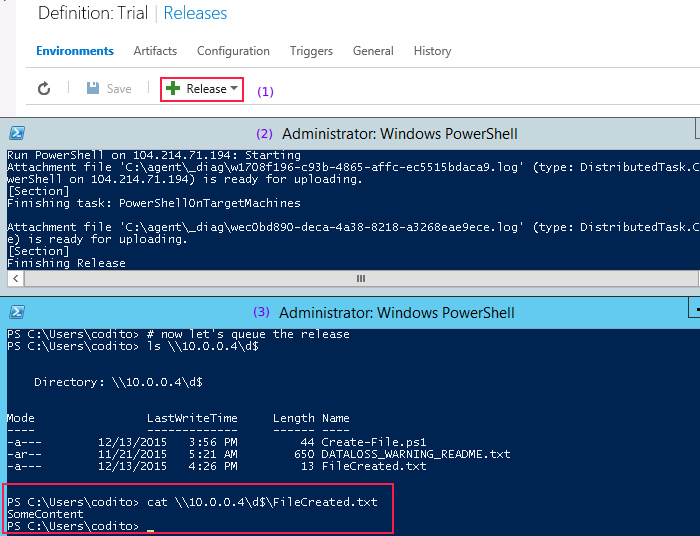
Figure: Queue a release
Steps to queue a release:
- Click on the Release menu to create a new release
- Observe the release is immediately picked up by the Agent
- Wait for the release to complete. Check that the machine 10.0.0.4 now has a
new file created
D:\FileCreated.txt
Where Next?
Congrats on creating your first Deployment workflow! Move onto the concepts section to learn more.
Disclaimer
This guide intends to share tips and tricks related to products we love. It hopes to make life easier.
It is not official, doesn't offer any warranty of any type. It's not related to or endorsed by Microsoft. The official docs are here: build, rm. Visual Studio, Visual Studio Team System are trademarks of Microsoft.